Docker introduction
TL;DR I used Docker during last months. I write down here what I would have liked to know when beginning using it, what you can do with it and some tricks you need to be aware of.
What is docker ?
As a User
Docker is a project developped in Go. You can see it as a tool to put your apps/code/database/services in containers. As a user, containers look like virtual machines you can start and stop quickly. In fact, when your image is build, starting/stoping docker containers should only take seconds.
As a sysadmin
Docker was originally based on LXC. Now it uses its own user-space process management mechanism (you can read here if you want more informations on the underlying architecture of Docker).
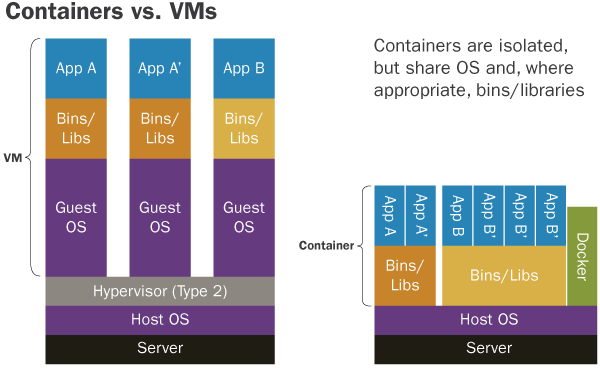
In fact there is no hypervisor (that would be present in the case of a VM). The term “lightweigt virtualization” is often used, but there is no virtualization. The docker-engine manages processes and take care of them, and their isolation. The size of a docker image can go from some MB to some hundred of MB. The average size is way less than with a VM. In fact, it takes less CPU/RAM/Disk than a VM, that is why for the same bare-metal machine, you can get more with docker than with VMs. It’s like filling a box with rocks or with sand.

Why is it cool ?
Docker begins to be widely used today, by dev, devops, Cloud Provider etc. Why ?
- Easy deployment: Each container has a single configuration file, the Dockerfile, where all the instructions to create the image are located. You want to launch your app ? Easy!
- Same prod and dev (if you want): You can have the same environment for the production ans the development, because each part of your project is in a container, which is isolated. No more issues like “it worked on my computer!”, it is easier to reproduce a bug.
-
Creating micro-services architecture: When you want your project to scale up, you have several possibilities for the service, like horizontal scalability. But maybe you also want your code to be better organized, so to maintain it, you can develop a micro-services architecture. Docker is a very good choice for this approach, whether you use docker-compose when deploying your services when it is a small project, or Kubernetes for a more robust solution.
- It is plateform-agnostic, you can run it on Windows, Linux (Debian, Ubuntu, CentOS …), on AWS etc.
- You can access to docker images of the community freely. You want to deploy an nginx ? Just pull the official image, and use it
- Another use case is to use it to execute your tests. It is isolated, so you can install whatever you need, no problem!
- You can duplicate containers to have horizontal scalability (more advanced use case).
How to use it ?
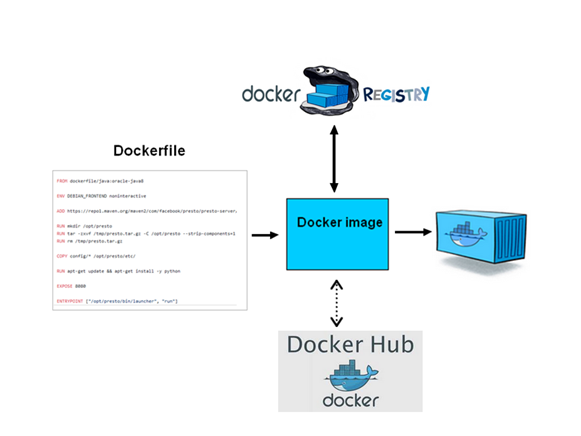
Here is the process of building a container

At the beginning, you write a Dockerfile to describe what you want to put in your image: a python project? A java? A PostgreSQL database ? Then, you can create an image, from this Dockerfile. From this image, you can run one or more containers. What is the difference between images and containers ? You can see it like in OOP: the image is the class, and the container is the object. You can instantiate several objects from a single class, each of them owning their data. If we continue with the metaphor we can say that the Dockerfile corresponds to the code you write to describe you class.
Docker pull
On the schema, you also have the docker hub, wich is a place when you can push you images, and where you can also pull images from other people ! For example, if I want to run a nginx locally, I can pull the image locally like this:
docker pull nginx
Then, you can instantiate it like this (=creating a container):
docker run -p 80:80 nginx
NB: The -p option is here to map the port of the host to the port of the container. Each request coming on the port 80 of the host will be redirect to the port 80 of the container.
On the schema, there is also a docker registery, wich is like a docker hub (= a place to push all your images), but you host it where you want, images are yours and you don’t have to share them with anyone. It is an interesting tool for business.
Docker build
Maybe you want to create your own image. Well for that, you have to write your configuration in a Dockerfile (written that way) Let’s say we want to create an hello-world with python.
mkdir hello-world && cd hello-world
We create a python file (hello.py) wich prints our message:
print("Hello world")
#First we specify the base image we are using. Here we take the official python one, where python is already installed
FROM python:3.6

# As we said before, as a user, the utilization of a container is like a VM. Many of them are build
# on top of linux, so when you log in the container, you will have the classic folder of linux (/var, /etc, /bin ...)
# We create a "hello" folder, to store our application
RUN mkdir /hello

#we specify that our working directory is "/hello", instead of "/", by default.
WORKDIR /hello

#we add "hello.py" from our host to the container. "." means current directory, wich is "hello", thanks to the previous line.
ADD hello.py .

#and then we specify the command to run when launching the container
CMD ["python", "hello.py"]
Then, we can build our image with :
docker build -t hello .
NB: -t option let you tag your image, to give it a more convenient name than “8f85s6df3f3”. The “.” specify the location of the Dockerfile.
You can list your images with :
docker images
>>>REPOSITORY                           TAG                 IMAGE ID            CREATED             SIZE
>>>hello                                latest              e1aba4171710        6 minutes ago       690MB
Now you can run your image, easily:
docker run hello
>>> Hello world!
NB: Here the size is quite important because I used the docker image of python 3.6 (“FROM python:3.6”), wich is built on top of a debian image. We could reduce this size drastically by using the “alpine” version.
That’s all! You have an image wich can be deployed on your linux, windows, mac, on the cloud or whatever, it will works the same way !
Now, you can stop the container with:
docker stop <container-id>
and restart it with:
docker start <container-id>
You can also stop using these two commands, be stateless, so your containers have no data, and are all the same. Each time you want to launch your application, you just have to run your image, it is easier (it is just my personal opinion here, feel free to debate).
Be stateless !
With docker, you can mount volumes. It means you can share data between the host and the container, like this:
docker run -v /home/foo/bar:/foo
It will mount the “/home/foo/bar” folder of the host on the “/foo” folder of the container. Each time you run your image, data will not be lost (you need it for a database container for example). If you don’t do that, and you change the code of your app in the container, you will have to rebuild an image, so a new container, so you will lose your data, wich is sad.
Warning: From personnal experience, sometimes you will forget that you have volumes, and will not understand why you app does not work properly. Remember that data and states are now on the host when you are debugging.
Some tips/problem encoutered
Docker-compose
Docker-compose is a great tool, it is like a mini-orchestrator. You specify wich image you want to build and container you want to instantiate, what ports you want to map etc. It is a single configuration file for your project, and it also create a docker network so that your container can communicate with each other using their names.
Example:
version: '3'
services:
  web:
    build: .
    ports:
     - "5000:5000"
  redis:
    image: "redis:alpine"
Build context
When you are building your image, the current folder is sent to the docker context (due to the client-server architecture of Docker, from what I understood), which means you can’t add a file from a parent folder, by default. There is a workaround that i described here : https://github.com/moby/moby/issues/2745#issuecomment-290047384, but the downside is that your image will be bigger, since the context of parent folder is sent to docker. You can see an interesting discussion about this problem on the github issue.
So if you want to add a file from a parent structure, do the following.
I you have a tree like this:
A
│   README.md
└───B
│   │   myJson.json
│
└───C
    │   Dockerfile
And you need to access myJson.json from the dockerfile, just write the dockerfile as if you were in A:
FROM my_image
ADD ./B/myJson.json .
And then launch docker specifying the path to the Dockerfile:
docker build -f ./C/Dockerfile .
That way, it work for me.
Moreover if you use docker compose, you can also do (assuming your docker-compose.yml is in A):
version: '3'
services:
  my_service:
    build:
      context: ./
      dockerfile: ./C/Dockerfile
Expose and -p
When you want to share a port with the host, use
docker run -p 8080:80 <my_image>
It means “every request coming in the 8080 port of the host will be redirected to the port 80 of this container”. Warning: You can have only one container per host’s port.
When you want to make inter-container communication, use EXPOSE
Inter-container communication
Docker-compose automatically creates a docker network, so that container can talk to each other. You can also create this network easily:
docker network create --driver bridge --attachable <network_name>
docker network connect --alias <container1> <network_name> <container1>
docker network connect --alias <container2> <network_name> <container2>
Now if you want to call the container
Enter in a container:
docker exec -ti <container_name> bash
Now you can use it like a classical VM.
Entrypoint vs CMD
The CMD in the Dockerfile specifies the default command to launch when running the container. You can also specify the ENTRYPOINT. By default it is “/bin/sh -c”. For some needs, you need to custom it (like in the postgreSQL Dockerfile, but generally you don’t need to. Warning: When using CMD, use double-quotes:
#BAD
CMD ['python', 'hello.py']

#GOOD
CMD ["python","hello.py"]